Monday, January 21, 2013

4-wheeler Diaper Cake


We love 4 wheeling and so do out friends that are having a birthday, so this 4-wheeler cake was perfect! Supplies: 
1 bib
5 washcloths
Diapers
Ribbon (optional) 
4 receiving Blankets
bottle or sippy cup
Dishwasher Rack
Stuffed animal
mittens or socks
rubberbands


Use a cake pan and the diapers to make 4 wheels and use a rubberband to secure the wheels. This is where you can add the ribbon to cover up the rubberband if wanted.

Take 2 of the receiving blankets and roll them to be the width of the dishwasher rack plus some to stick inside the center of the wheels. Secure the ends with rubberbands. These will be the axels.

Wrap the dishwasher rack in the 3rd receiving blanket. This will be the body.

Put one washcloth in the bottle to add some color. Stick the bottle or sippy cup on top of the dishwasher rack to be the light.

Use the 4th receiving blanket to make the handles. Wrap around the base of the dishwasher rack, up and around the bottle, and secure the two sides together with a rubberband just above the bottle. 

Put the axels into the center of the wheels. Then lay the dishwasher rack on top of the axels.

Add a washcloth to each of the wheels to be the fenders.

Lay the bib on the dishwasher rack to act as the seat.

Add the mittens or socks to the end of the handles to be the handle bars. 

Lastly, add a stuffed animal to be the rider!


We always make Christmas cut-out cookies, but this year we did something a little different. We found a cookie cutter set at an antique shop. It was a Wilton brand set and it had 10 different sized star shaped to make this tree. They came out super cute and got a lot of compliments. Don't like cookies? You can use anything that you can cut! Rice Krispies, jello, etc! The possibilities are endless.


Simple DIY Party decorations

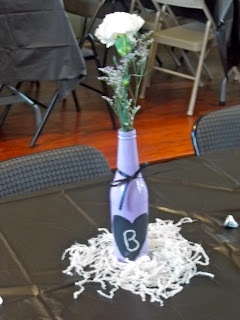
We recently had a Surprise birthday party for my mother-in-law and I was trying to think of something for centerpieces that would be simple, yet cheap. So I came up with just simple beer bottles painted, will a little special personalized touch, and very inexpensive.

I started with just a simple Beer bottle. In order to get the labels off, I just soaked them in a sink full of hot soapy water for about 15 minutes. The labels came right off and a sponge easily took the glue off.

For a little bit of color, I just painted them with spray paint. Cheap way to add a lot of color to the party!


After that dried, I added a chalkboard paint heart that way I could put a B on the bottles for her name.


I made my own chalkboard paint because it is a lot cheaper than buying some! The recipe is 1 tablespoon unsanded grout (I found mine at Home depot. A 5 pound box for only $6) and 1/2 cup acrylic paint. You can use any color you want of acrylic paint, but I just used black. Just mix really well in a plastic cup with a plastic spoon and wa-la!


 So for a finished product......They were adorable! I added just a simple ribbon bow and some shredded paper at the base. With the carnation and a hint of baby's breath, it looked so cute. I got a lot of compliments on how cute and simple they were!


So, for the total transformation:


I needed something to add to the walls for decoration and I came with this story with candy bars! It was  a huge hit with our guests! I didn't spend much on candy and I just used a foam poster board. The candy stuck great to the board with rubber cement. To eat the candy, they can just cut the ends off the the candy bars and slide them out. That way, you don't loose the store!


She was so surprised and I couldn't have been happier with the way things turned out. The food, decorations, and just little personalized touches all came out perfect!